By The Apache Software Foundation - From File:ASF-logo (2016).svg, edited in Inkscape: rotated to match the design of File:Apache HTTP server logo (2016).png and some cleanup; optimised using Scour., Apache License 2.0, https://commons.wikimedia.org/w/index.php?curid=47190352
The Apache HTTP Server Project is an effort to develop and maintain an open-source HTTP server for modern operating systems including UNIX and Windows. The goal of this project is to provide a secure, efficient and extensible server that provides HTTP services in sync with the current HTTP standards.
In this guide, we’ll explain how to install an Apache server on your Ubuntu 18.04 server. Take care of the security configuration. Then we`ll explain how to create virtual hosts for a custom domain and serve the website.
1-Installing Apache
Apache is available within Ubuntu’a default repositories.
We are going to update the local package index to reflect the latest upstream changes:
$ sudo apt update |
Then, install apache2 package:
$ sudo apt install apache2 |
2-Configure the firewall
Since, you wish to serve a file to allow outside access to the default web ports, the firewall has to be configured in order to restrict access to your server.
During its installation apache2 registers itself with UFW to provide a few application profiles that can be used to enable or disable access to Apache through the firewall.
You can list the ufw application profiles by typing:
$ sudo ufw app list |
You should see a list of application profiles with 3 profiles for Apache:
- Apache: This profile opens only port 80 (normal, unencrypted web traffic)
- Apache Full: This profile opens both port 80 and port 443(TLS/SSL encrypted traffic)
- Apache Secure: This profile opens only port 443(TLS/SSL encrypted traffci)
I recommend to enable the most restrictive profile, if you do not know which one to activate in order to test. Or, enable the one adapted to you needs.
$ sudo ufw allow 'Apache' |
You can see the change by typing:
sudo ufw status |
You should see HTTP traffic allowed in the output:
Status: active |
The profile has been acivated to allow access to the web server.
3-Checking the web server
If the installation process went well, the server should already be up and running.
You can check with systemd:
$ sudo systemctl status apache2 |
- apache2.service - The Apache HTTP Server |
From the output above, the service appears to be running.
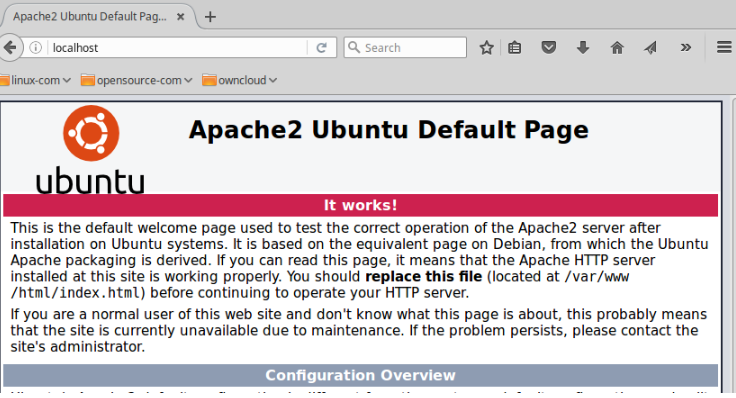
The best way to test the server is to request a page from Apache.
You can access the default Apache landing page by entering in you favorite web browser:
http://ip_address |
You should be able to see this:
4 Manage Apache service
To stop the server:
$ sudo systemctl stop apache2 |
To start the server:
$ sudo systemctl start apache2 |
Of course, you can use restart to stop and start the service again:
$ sudo systemctl restart apache2 |
For simple configuration changes, it is better to use:
$ sudo systemctl reload apache2 |
5 Setting up virtual hosts
For this section, let’s say that toto.me is your domain.
Do not use toto.me domain if it is not yours. Use your own on domain.
Apache is by default configured to serve documents from the /var/www/ directory.
Create the directory for toto.me, for example:
$ sudo mkdir /var/www/toto.me |
Assign ownership of this directory with the $USER environment variable:
$ sudo chown -R $USER:$USER /var/www/toto.me |
Modify the permissions with:
$ sudo chmod -R 755 /var/www/toto.me |
Go to your directory, create a sample index.html page using nano:
$ nano index.html |
Inside, copy paste this html code:
<html> |
Save and close using Ctrl+x
Now, in order to say to Apache: “Hey, serve my website here with this domain !”.
We have to use the correct directives which will help us to create our virtual host.
Instead of modifying the default configuration file located at
/etc/apache2/sites-available/000-default.conf, I advise to create a new one for your domain.
Create a configuration file named “toto.me.conf” in /etc/apache2/sites-available/ directory.
Paste the following directives in this file :
<VirtualHost *:80> |
Apache directives explanation:
ServerAdmin should be the email of the webmaster.
This directive is not necessary if you bought your domain with a private registration. By securing your domain, your private information will not be realeased to the public. Your provider is going to put its information instead and contact you if there is an issue with your domain. This information can be verified using whois command.
$ whois ip_address |
ServerName should be domain name.ServerAlias should be www.your_domainDocumentRoot shoud be the path of your website directory.ErrorLog sets the name of the file to which the server will log any errors it encountersCustomLog is used to log requests to the server.
Save and close the file.
You can get more information about the directives on Apache website, right here
Enable virtual host
To enable the virtual host:
$ sudo a2ensite toto.me.conf |
Disable the default site:
$ sudo a2dissite 000-default.conf |
Check for virtual host configuration files errors:
$ sudo apache2ctl configtest |
If your files are correct, you will see
Syntax OK |
Finally, restart Apache to implement your changes.
$ sudo systemctl restart apache2 |
That’s it ! Go on http://toto.me and it should show you :
Success! The toto.me virtual host is working!
Congratulations !
Conclusion
In this guide, we explained how to install an Apache server on your Ubuntu 18.04 server. Take care of the security configuration. Then we explained how to create virtual hosts for a custom domain and serve the website.
I hope it was helpful. If you have any questions about the article, leave them in the comments section below.
Stay tuned for my next article!

.svg)


